> ## Documentation Index
> Fetch the complete documentation index at: https://www.bolna.ai/docs/llms.txt
> Use this file to discover all available pages before exploring further.
# AiSensy WhatsApp Integration
> Connect your AiSensy account to a Bolna workflow so any step can send an approved WhatsApp template, then create and test a campaign in AiSensy if you need one.
Connect your AiSensy account to Bolna once, then send approved WhatsApp templates from any step of a workflow — no separate WhatsApp setup, no code.
## What is AiSensy?
AiSensy is a WhatsApp Business API platform. It sits between your business and Meta's official WhatsApp Business API — handling business verification, the approved sender number, template management, and message delivery, so you don't have to build against Meta's API yourself.
The pieces of AiSensy that matter for this integration:
* **Project** — your AiSensy workspace. Each project has its own WhatsApp Business number and its own API key.
* **Template** — a pre-written message format that Meta reviews and approves. On WhatsApp, business-initiated messages *must* use an approved template.
* **Campaign** — a launched instance of a template. This is what you actually select inside Bolna.
## How AiSensy is integrated into Bolna
AiSensy is integrated directly into Bolna [workflows](/docs/workflows/introduction). You paste your AiSensy **project API key** and **project ID** into Bolna once for authentication, and Bolna pulls in the list of WhatsApp campaigns running under that project. You pick a campaign, drop it into a workflow as an [`aisensy_whatsapp` node](/docs/workflows/nodes#aisensy_whatsapp), and Bolna sends that template on your behalf when the workflow reaches that step.
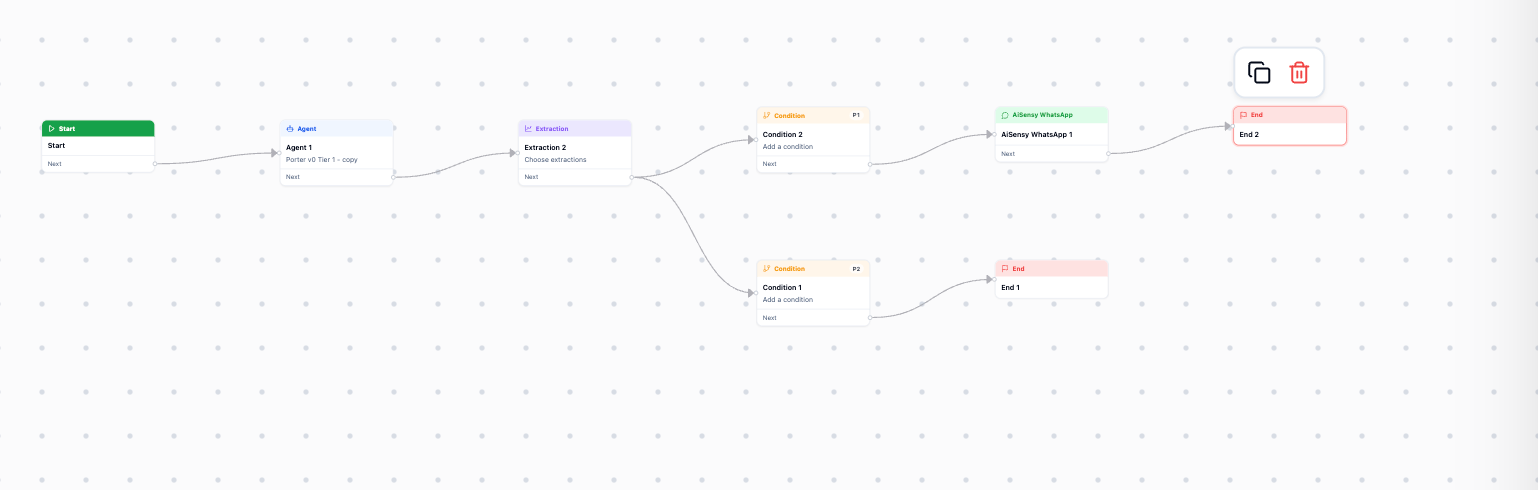
That means a single workflow can mix voice and WhatsApp — for example, calling a lead, extracting how the conversation went, branching on the result, and following up hot leads on WhatsApp while the cold ones just end.
 ## Before you start
| You need | Where it comes from |
| ----------------------------------------------------------- | --------------------------------------------------------------------------------------------------------------------------- |
| An AiSensy account with an active project | [aisensy.com](https://www.aisensy.com) |
| A WhatsApp Business number connected to that project | Set up during AiSensy onboarding |
| At least one Meta-approved template, launched as a campaign | See [Create a campaign in AiSensy](#dont-have-a-campaign-yet-create-one-in-aisensy) below — you can create one from scratch |
| A Bolna workflow (a draft is fine) | Bolna dashboard → Workflows |
## How to send a WhatsApp message in a Bolna workflow
1. In AiSensy, open the project you want to send from.
2. Go to **Developer** → **Project API Keys**.
## Before you start
| You need | Where it comes from |
| ----------------------------------------------------------- | --------------------------------------------------------------------------------------------------------------------------- |
| An AiSensy account with an active project | [aisensy.com](https://www.aisensy.com) |
| A WhatsApp Business number connected to that project | Set up during AiSensy onboarding |
| At least one Meta-approved template, launched as a campaign | See [Create a campaign in AiSensy](#dont-have-a-campaign-yet-create-one-in-aisensy) below — you can create one from scratch |
| A Bolna workflow (a draft is fine) | Bolna dashboard → Workflows |
## How to send a WhatsApp message in a Bolna workflow
1. In AiSensy, open the project you want to send from.
2. Go to **Developer** → **Project API Keys**.
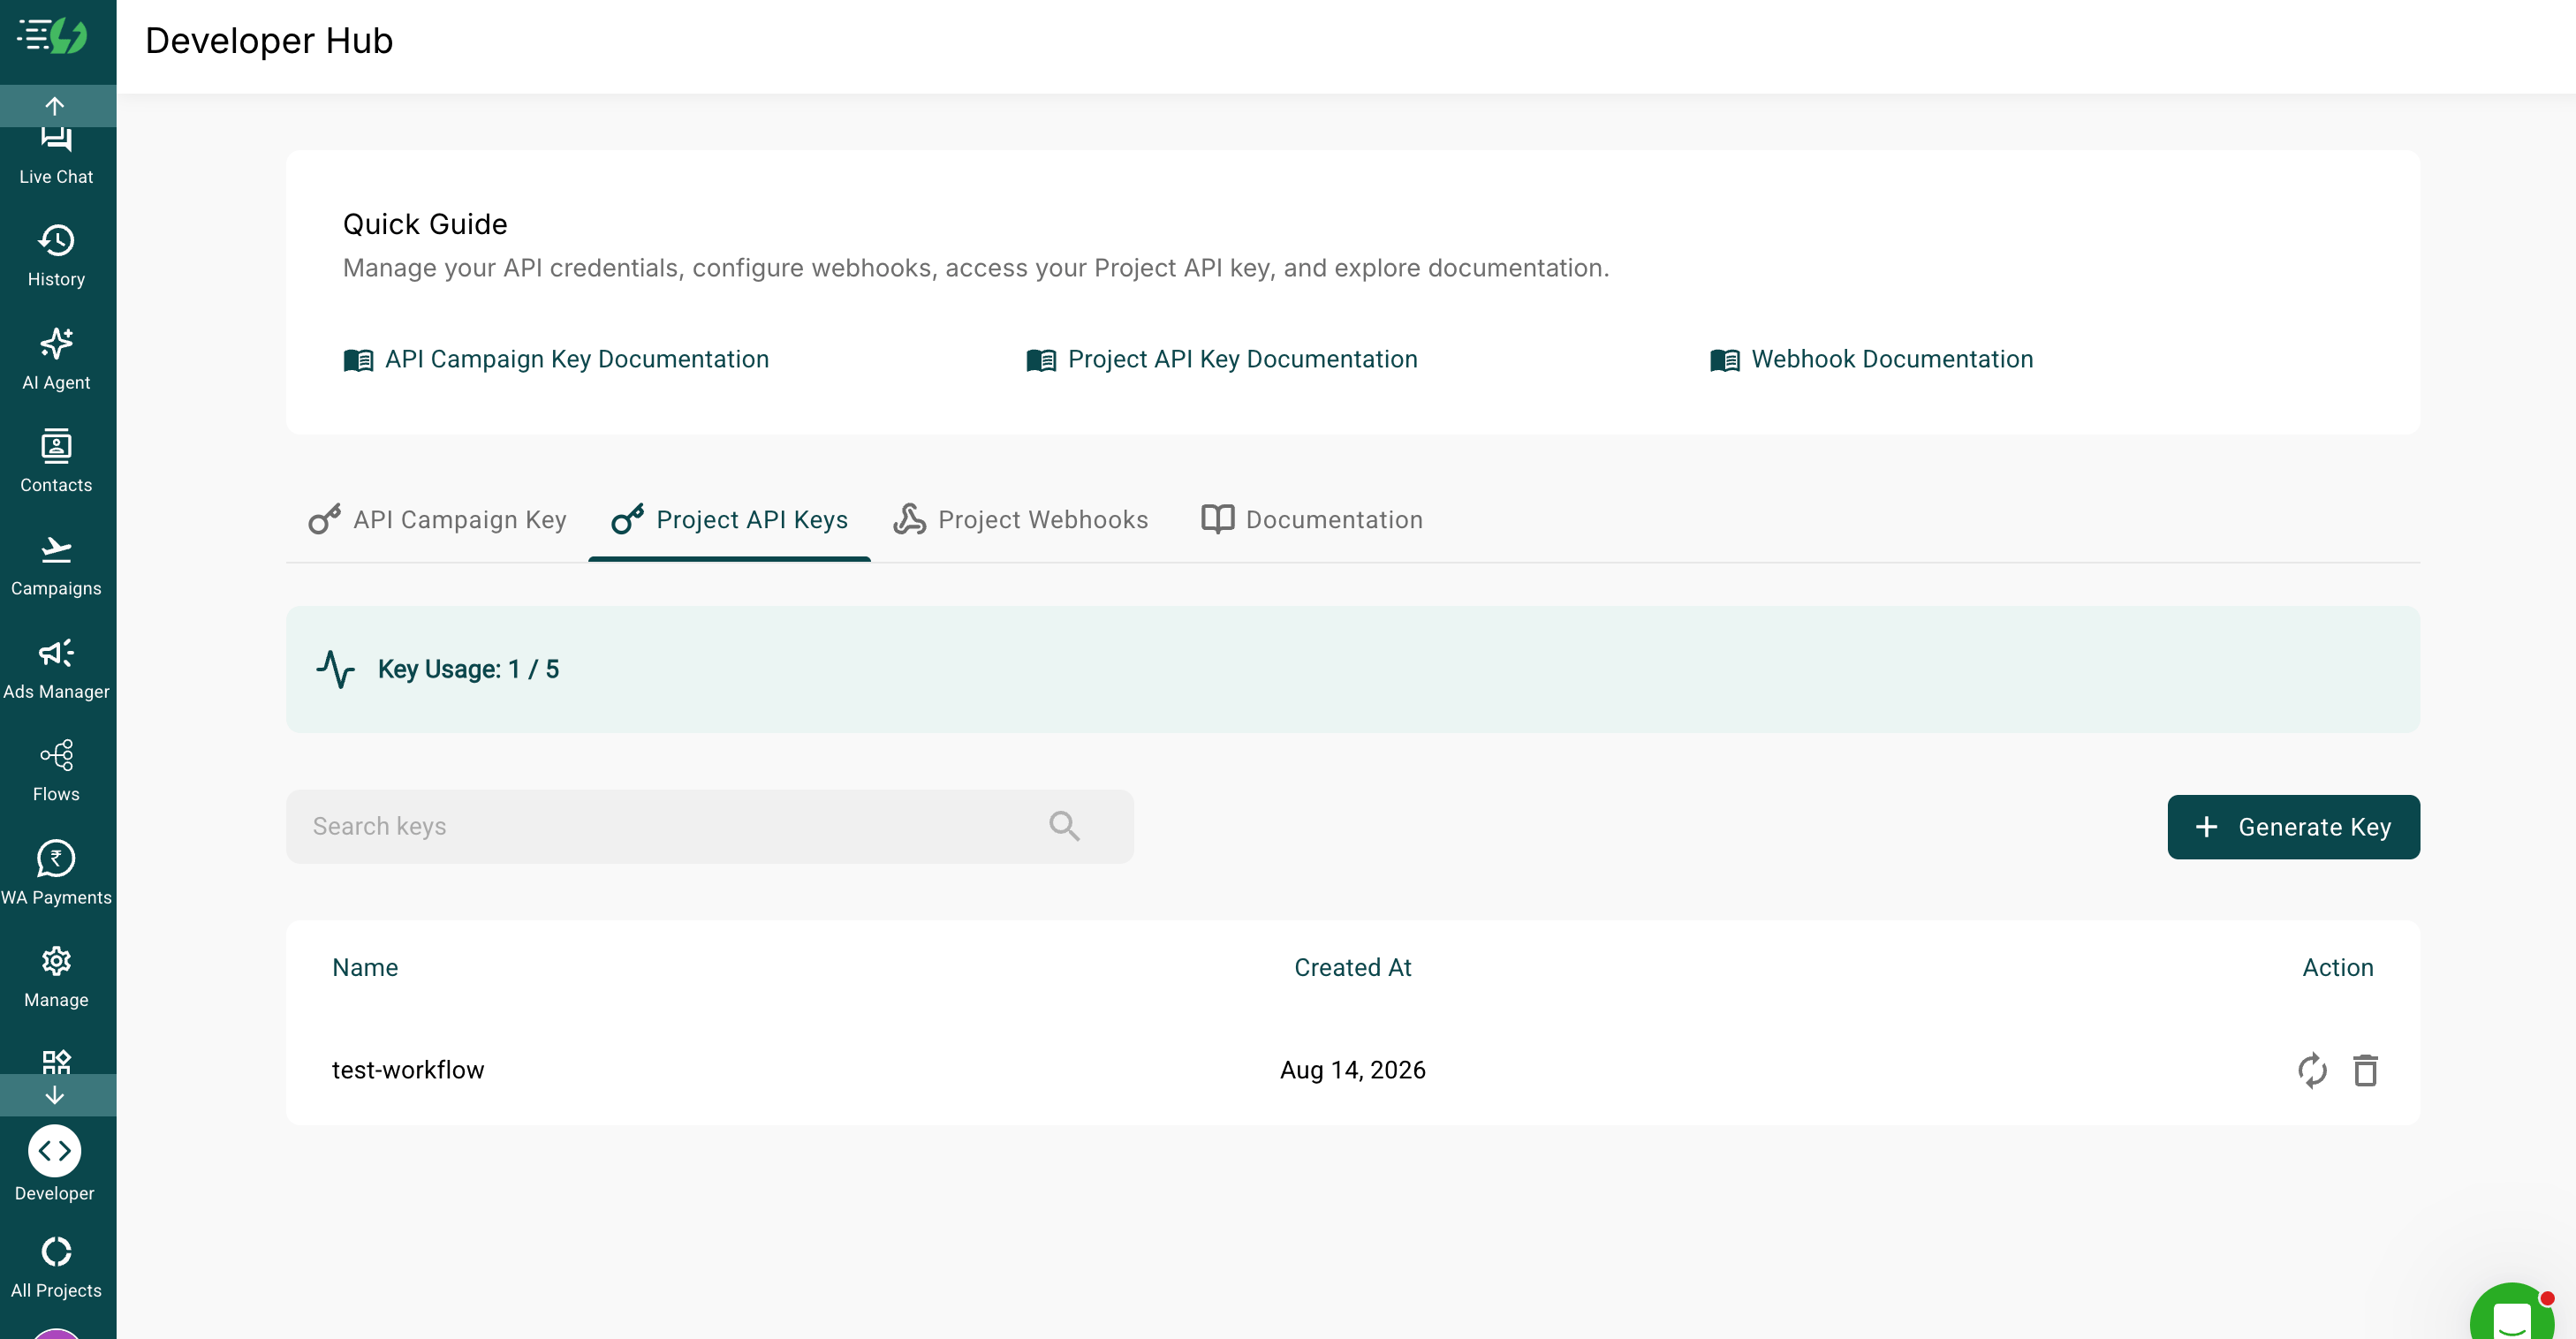 3. Copy the **project API key**.
4. In Bolna, open your workflow, add the **AiSensy WhatsApp** node, and paste the key and project ID, then click **Link AiSensy account**.
3. Copy the **project API key**.
4. In Bolna, open your workflow, add the **AiSensy WhatsApp** node, and paste the key and project ID, then click **Link AiSensy account**.
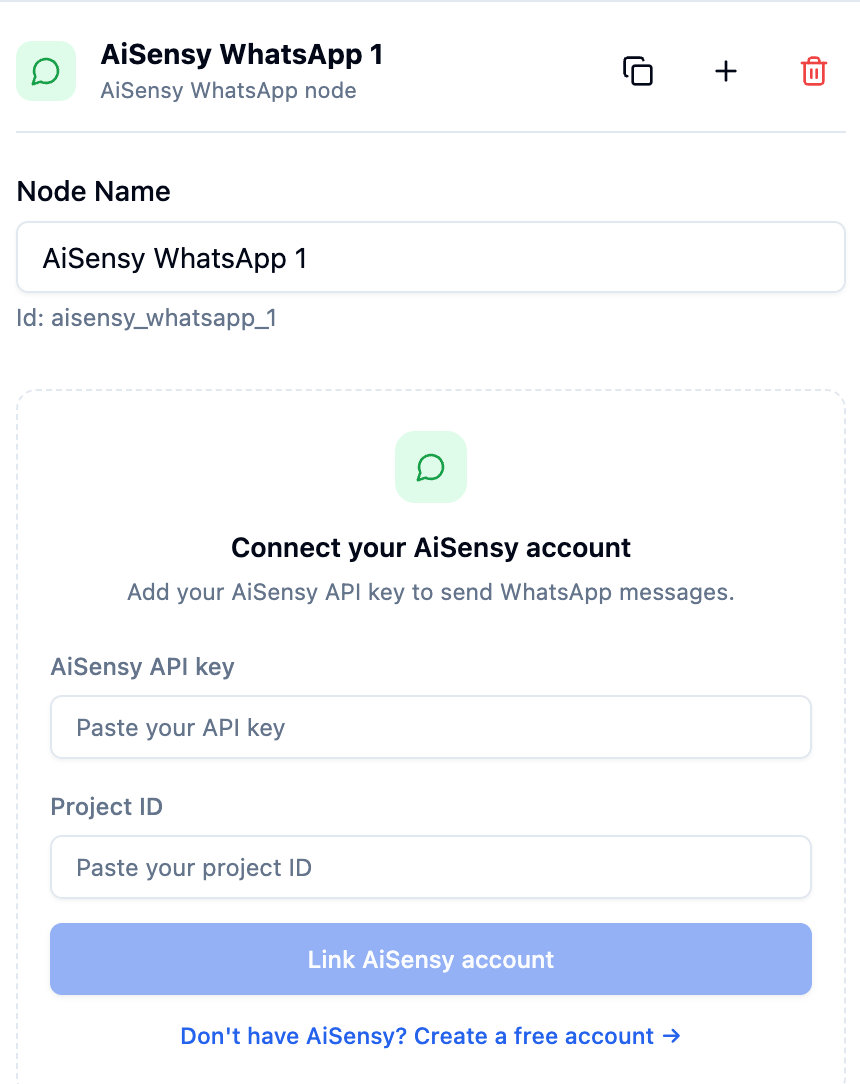 The API key is scoped to one AiSensy project. If you run multiple projects (different numbers or brands), use the key for the project whose number should appear as the sender.
Once the key is accepted, Bolna fetches every campaign running under that project and shows them as a list.
The API key is scoped to one AiSensy project. If you run multiple projects (different numbers or brands), use the key for the project whose number should appear as the sender.
Once the key is accepted, Bolna fetches every campaign running under that project and shows them as a list.
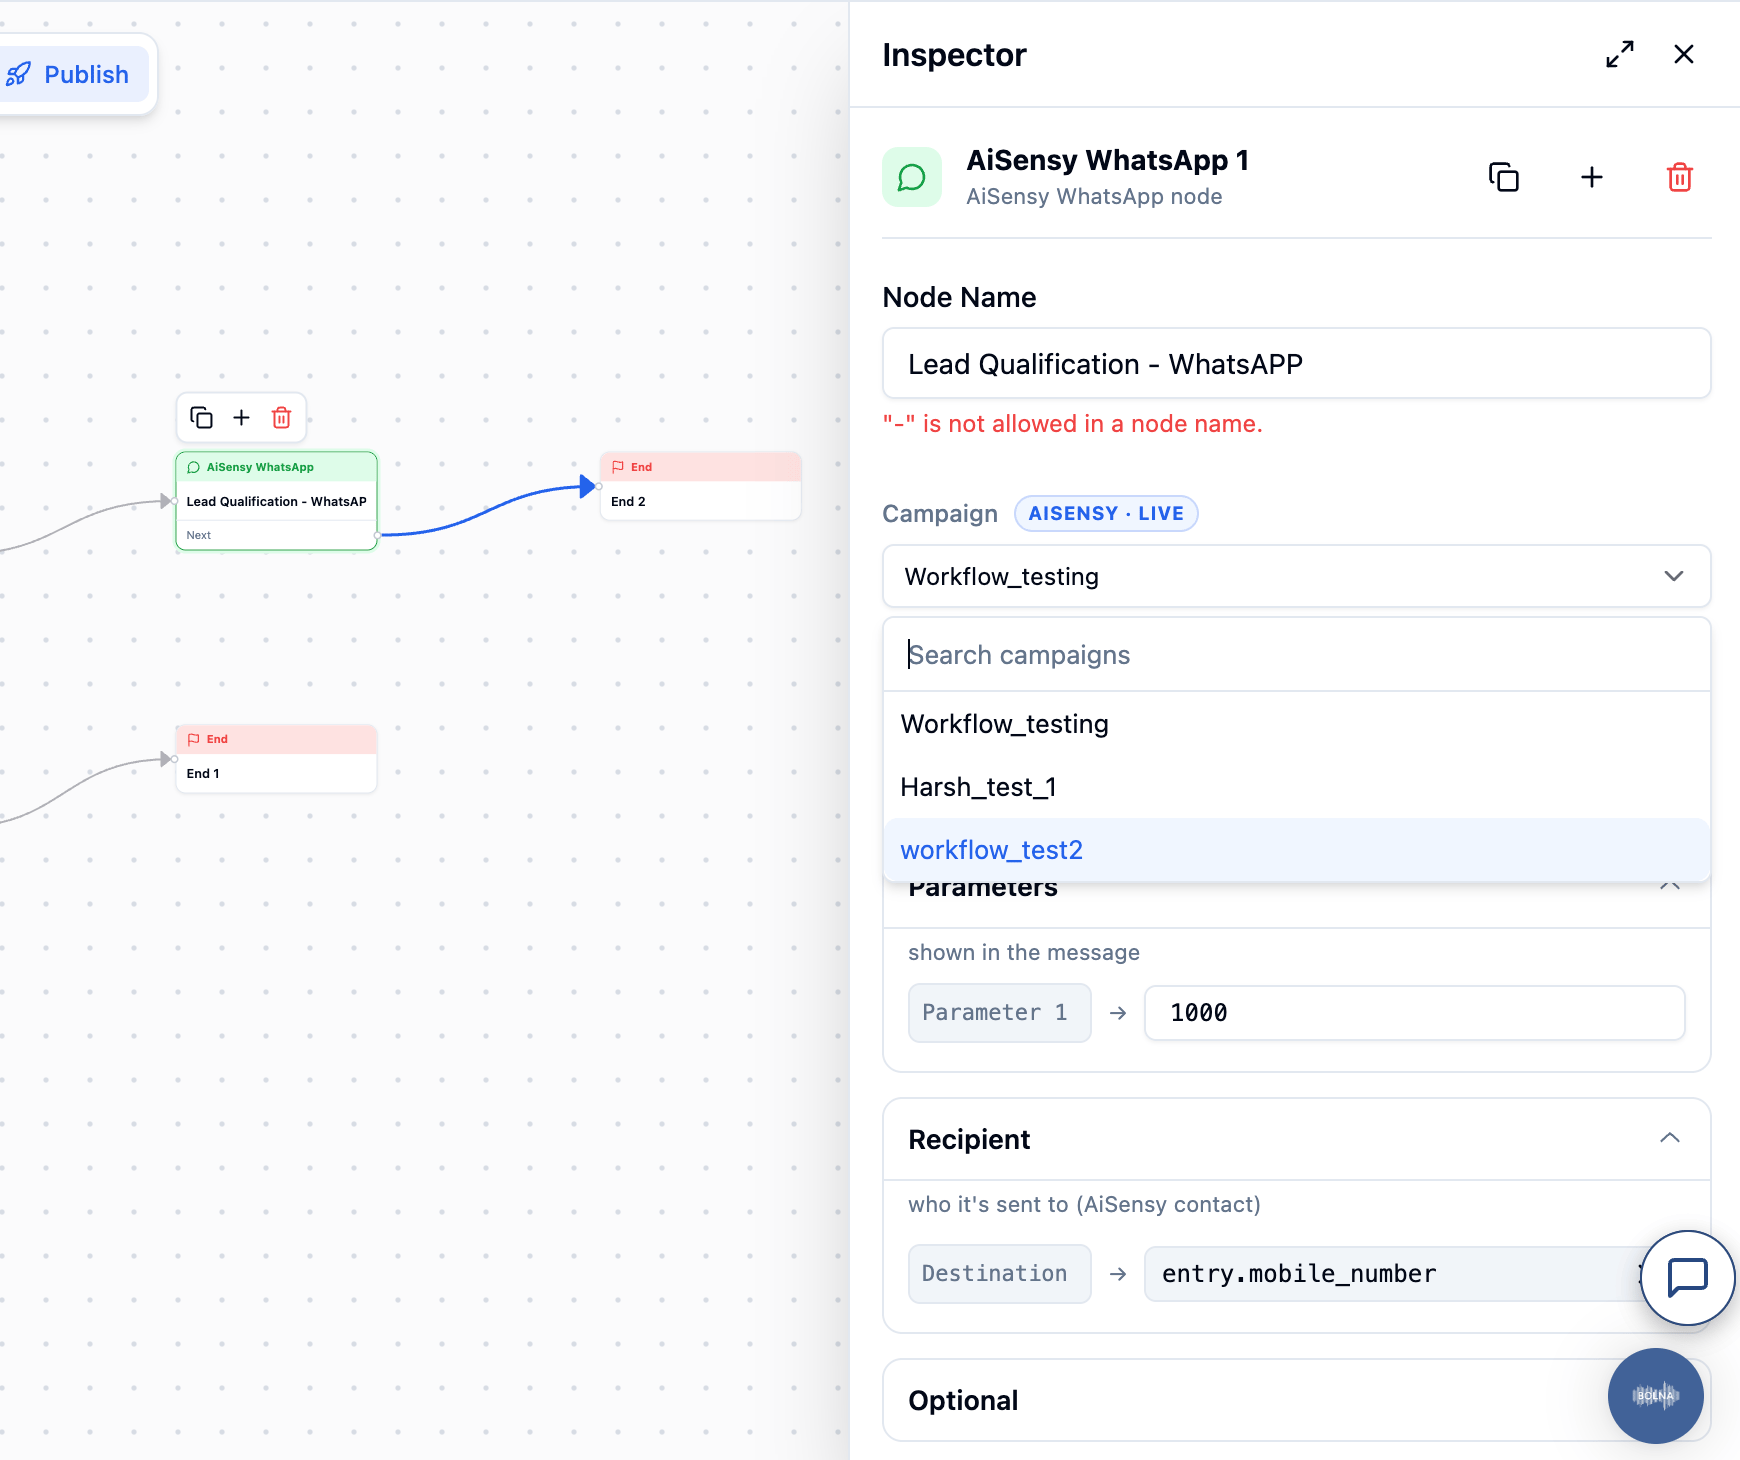 1. Select the campaign you want to use.
2. Fill in any template variables (name, order ID, date — whatever your template uses). You can also use workflow fields as message variables.
3. Send a test message to fire it to your own number and confirm the sender, wording, and variables all look right.
Always send a test before publishing. It's the fastest way to catch a wrong variable order or a template that reads oddly once the placeholders are filled in.
## Don't have a campaign yet? Create one in AiSensy
A campaign needs an approved template first. Templates are reviewed by Meta, so budget time for this — approval is usually quick but not instant.
### Create the WhatsApp template
1. Log in to the AiSensy project the campaign should live under.
2. From the left nav, select **Manage** (the gear icon), then **Template Message**.
1. Select the campaign you want to use.
2. Fill in any template variables (name, order ID, date — whatever your template uses). You can also use workflow fields as message variables.
3. Send a test message to fire it to your own number and confirm the sender, wording, and variables all look right.
Always send a test before publishing. It's the fastest way to catch a wrong variable order or a template that reads oddly once the placeholders are filled in.
## Don't have a campaign yet? Create one in AiSensy
A campaign needs an approved template first. Templates are reviewed by Meta, so budget time for this — approval is usually quick but not instant.
### Create the WhatsApp template
1. Log in to the AiSensy project the campaign should live under.
2. From the left nav, select **Manage** (the gear icon), then **Template Message**.
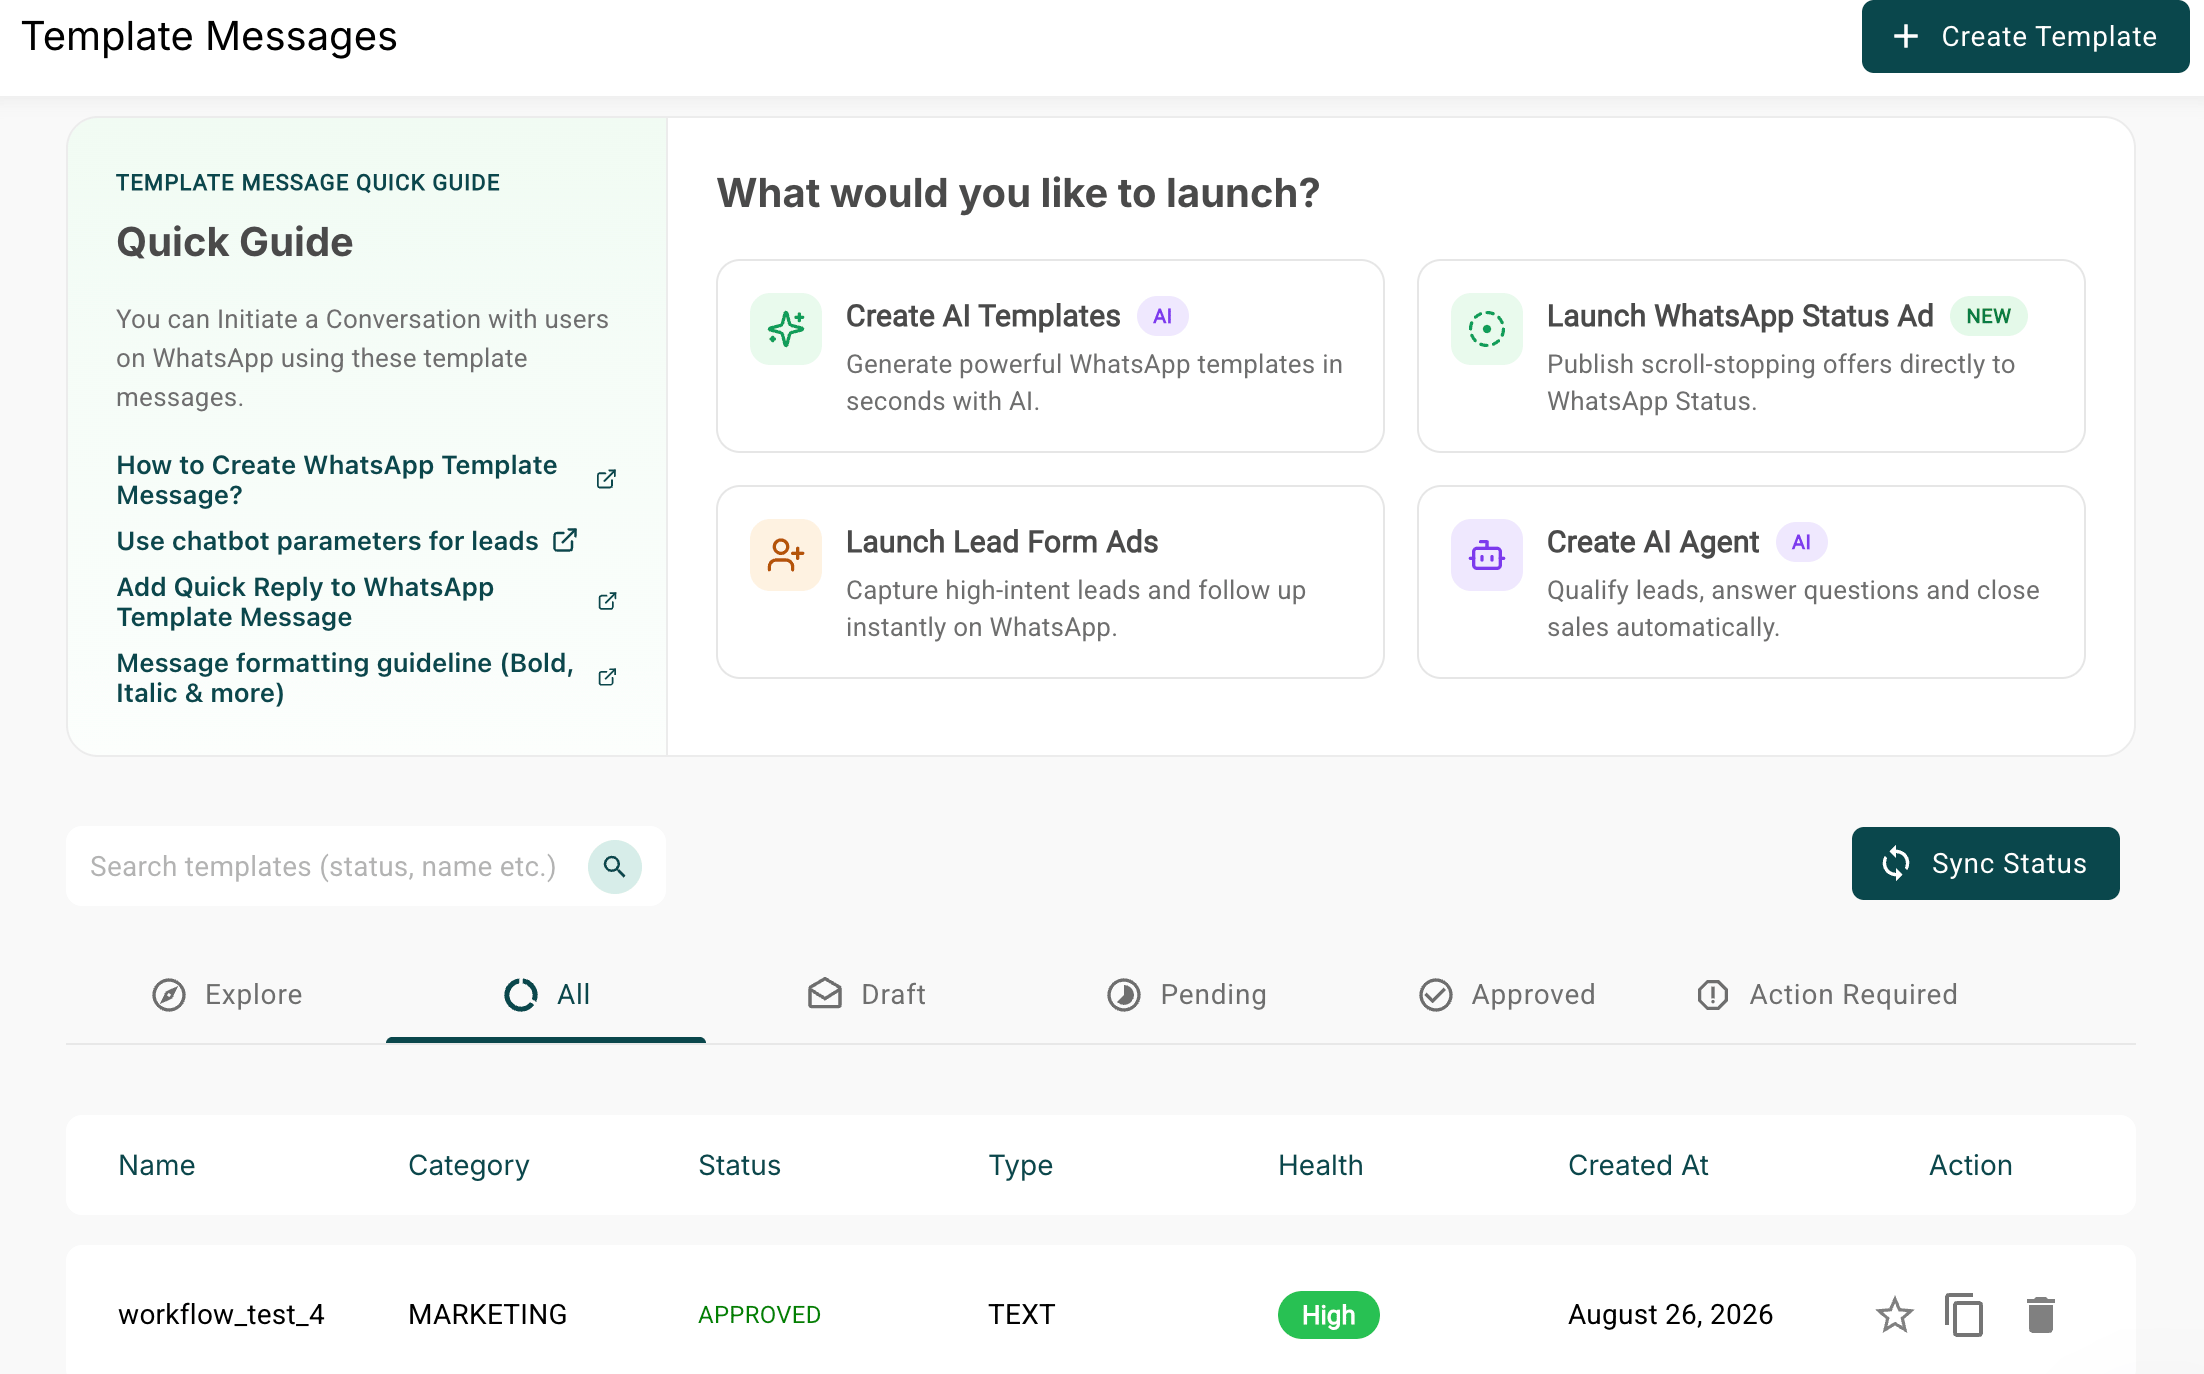
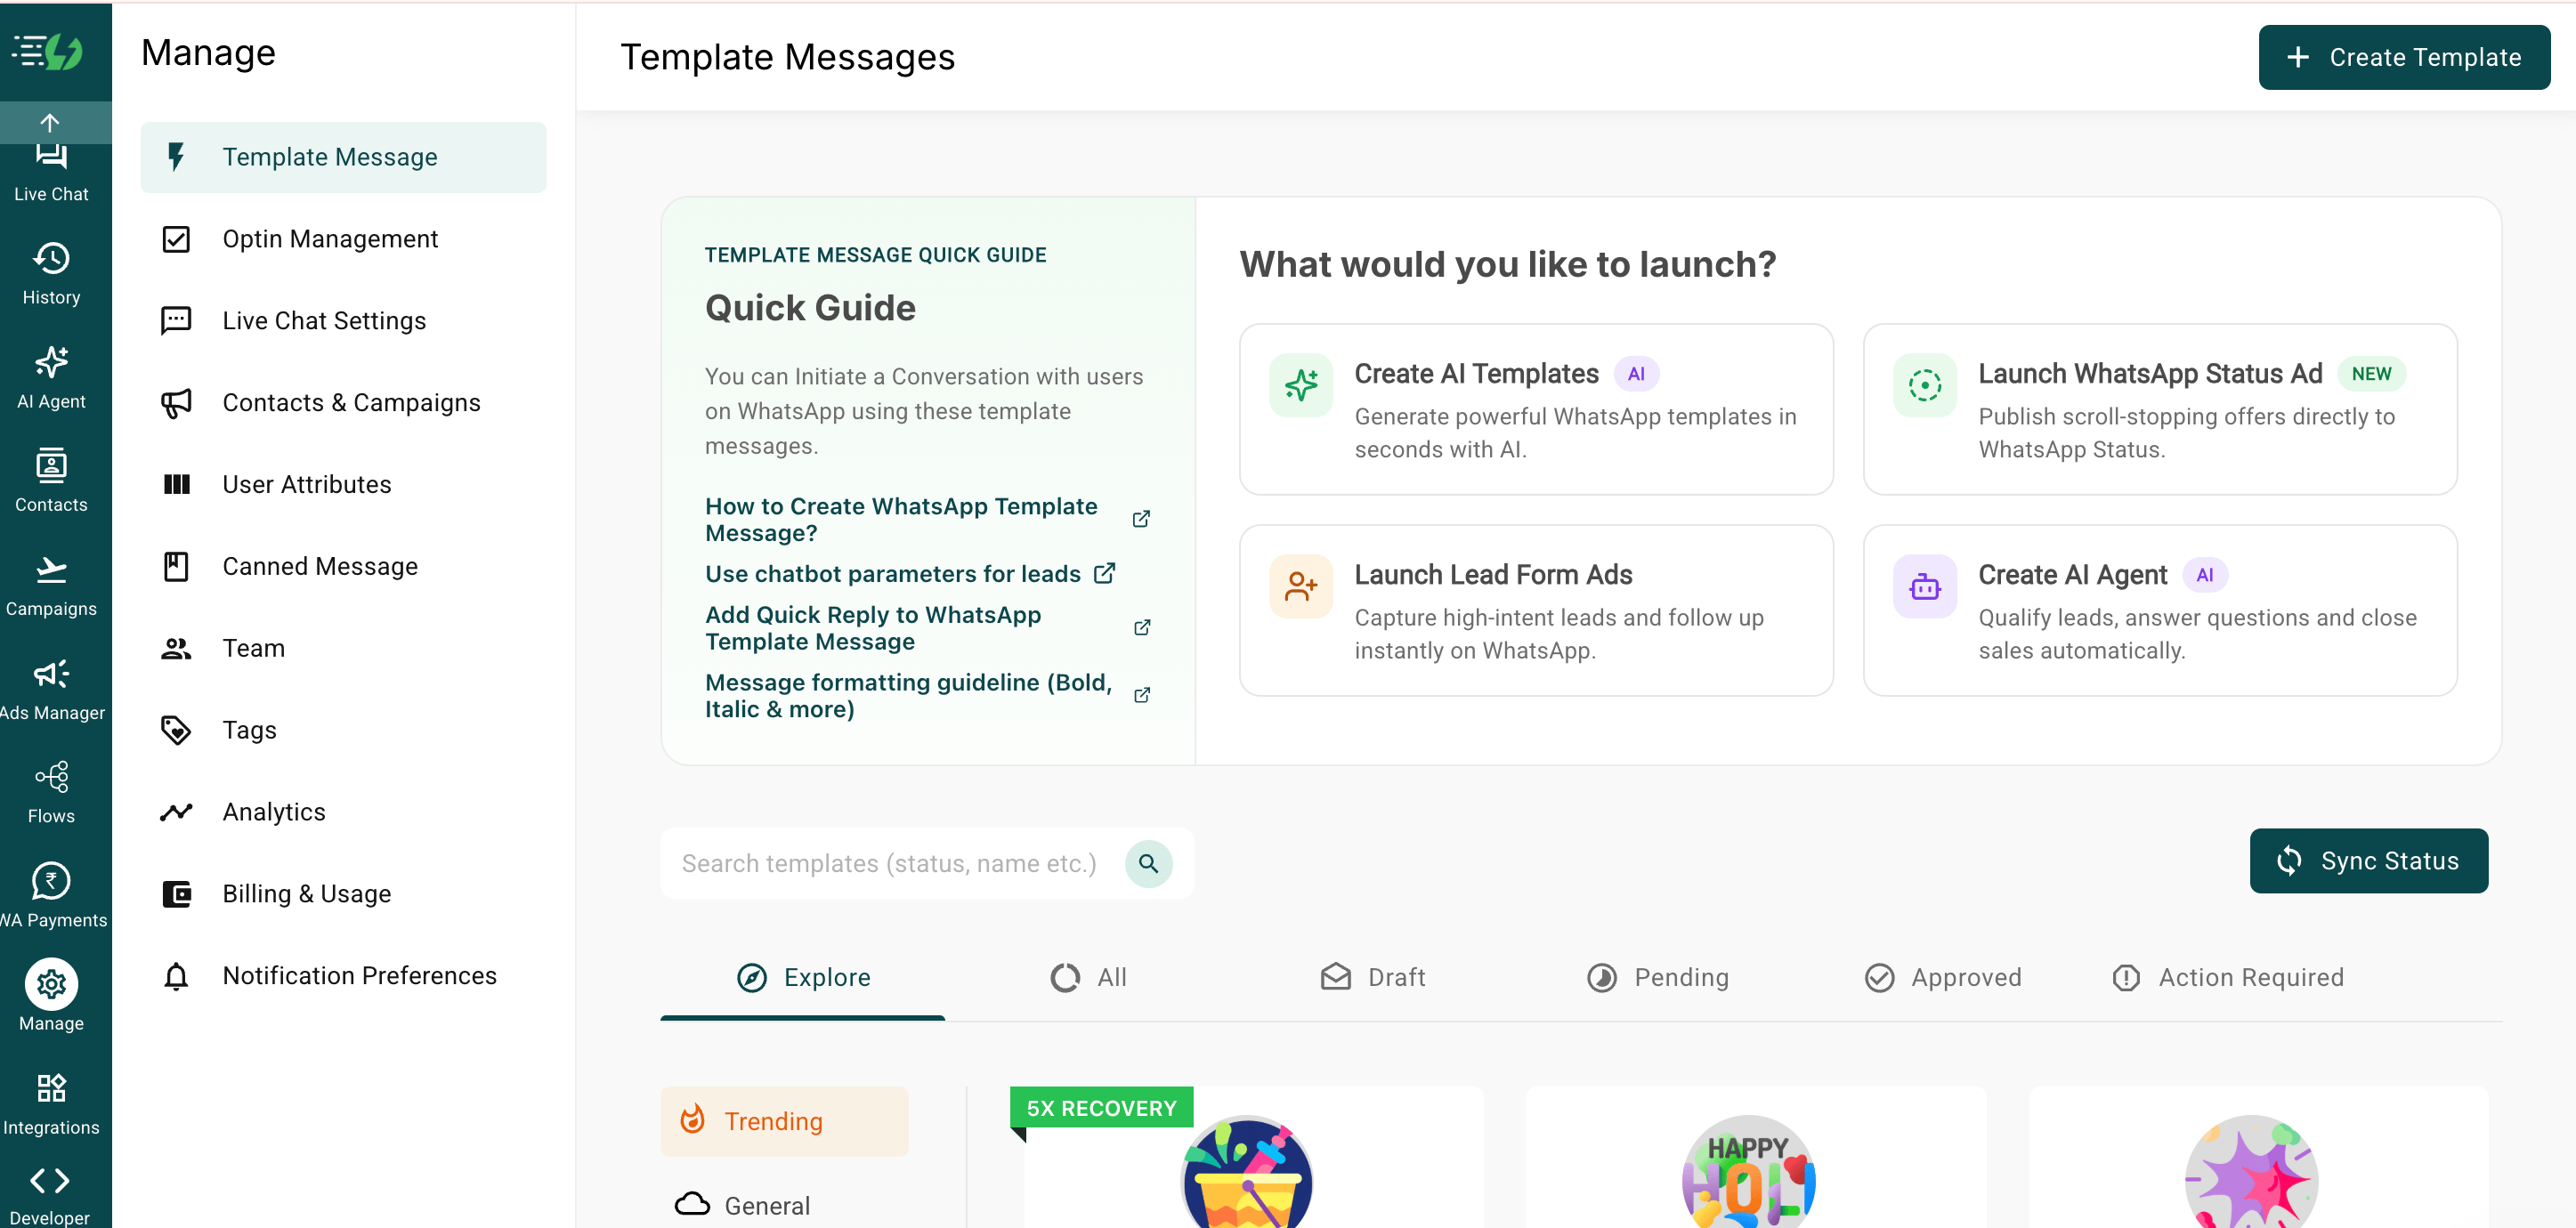 Click **Create Template** in the top right, build your WhatsApp template following the on-screen instructions, then submit it for Meta review.
Your submitted template appears under the **All** tab in the same section, with its current status.
Click **Create Template** in the top right, build your WhatsApp template following the on-screen instructions, then submit it for Meta review.
Your submitted template appears under the **All** tab in the same section, with its current status.
 ### Launch the campaign
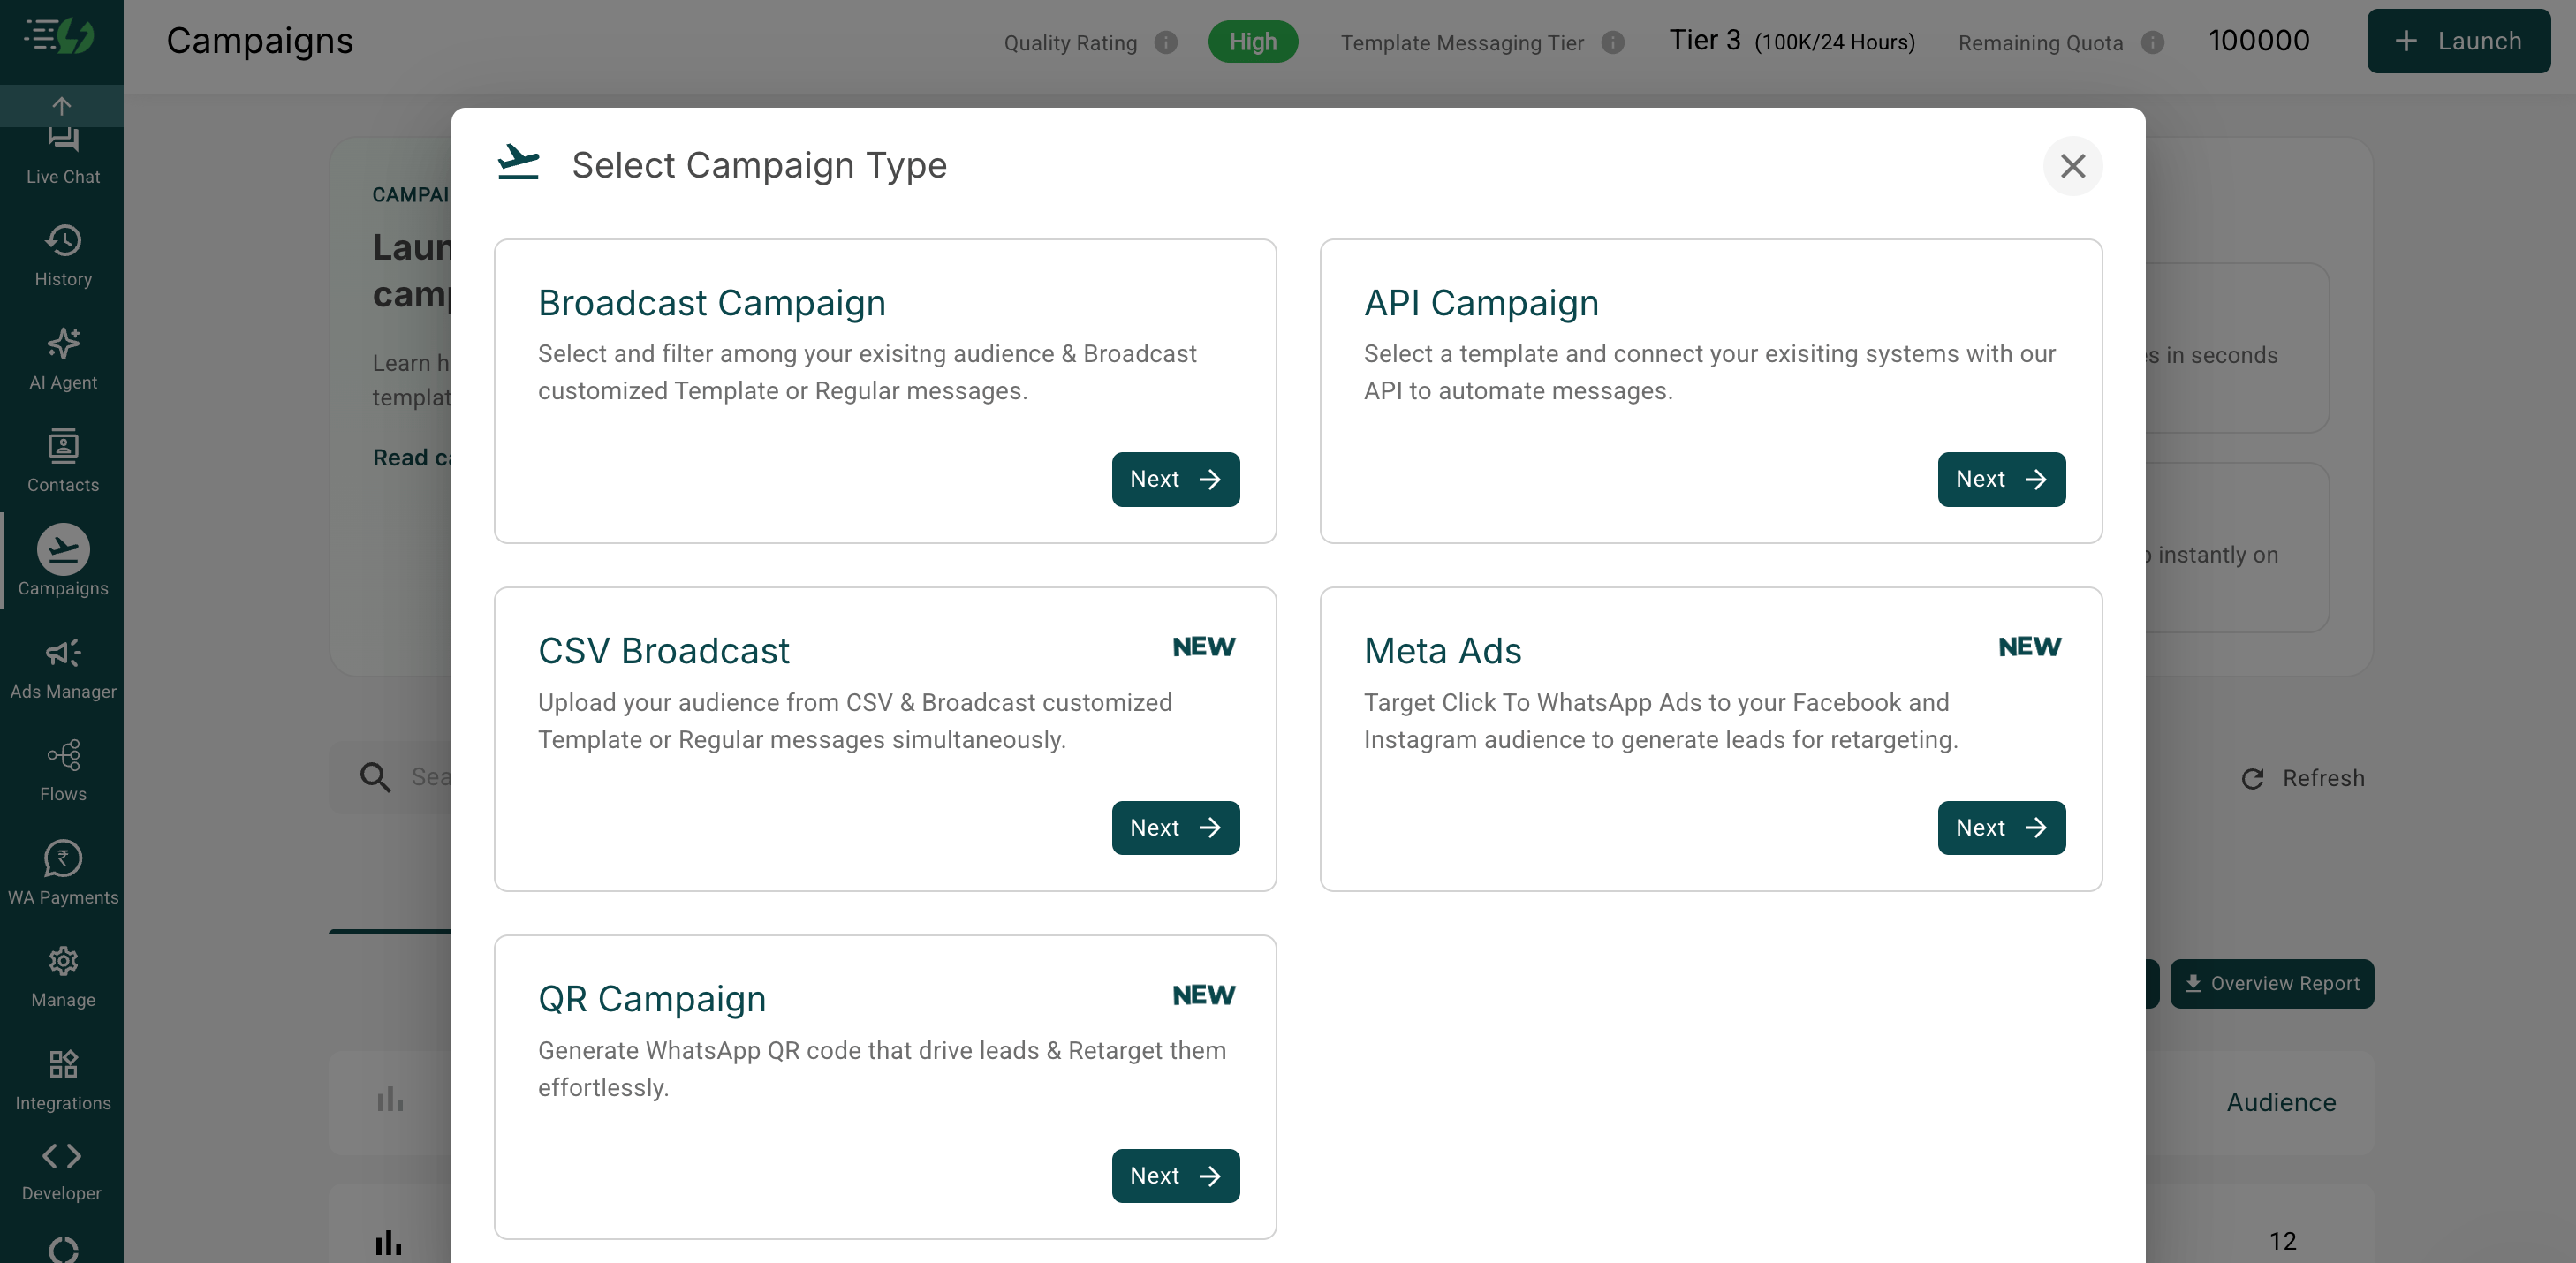
Once the template status turns **Approved**, go to **Campaigns** in the left nav, click **Launch** in the top right, then select **API Campaign**.
### Launch the campaign
Once the template status turns **Approved**, go to **Campaigns** in the left nav, click **Launch** in the top right, then select **API Campaign**.
 Give the campaign a name, select the template you just created, then click **Set Live**.
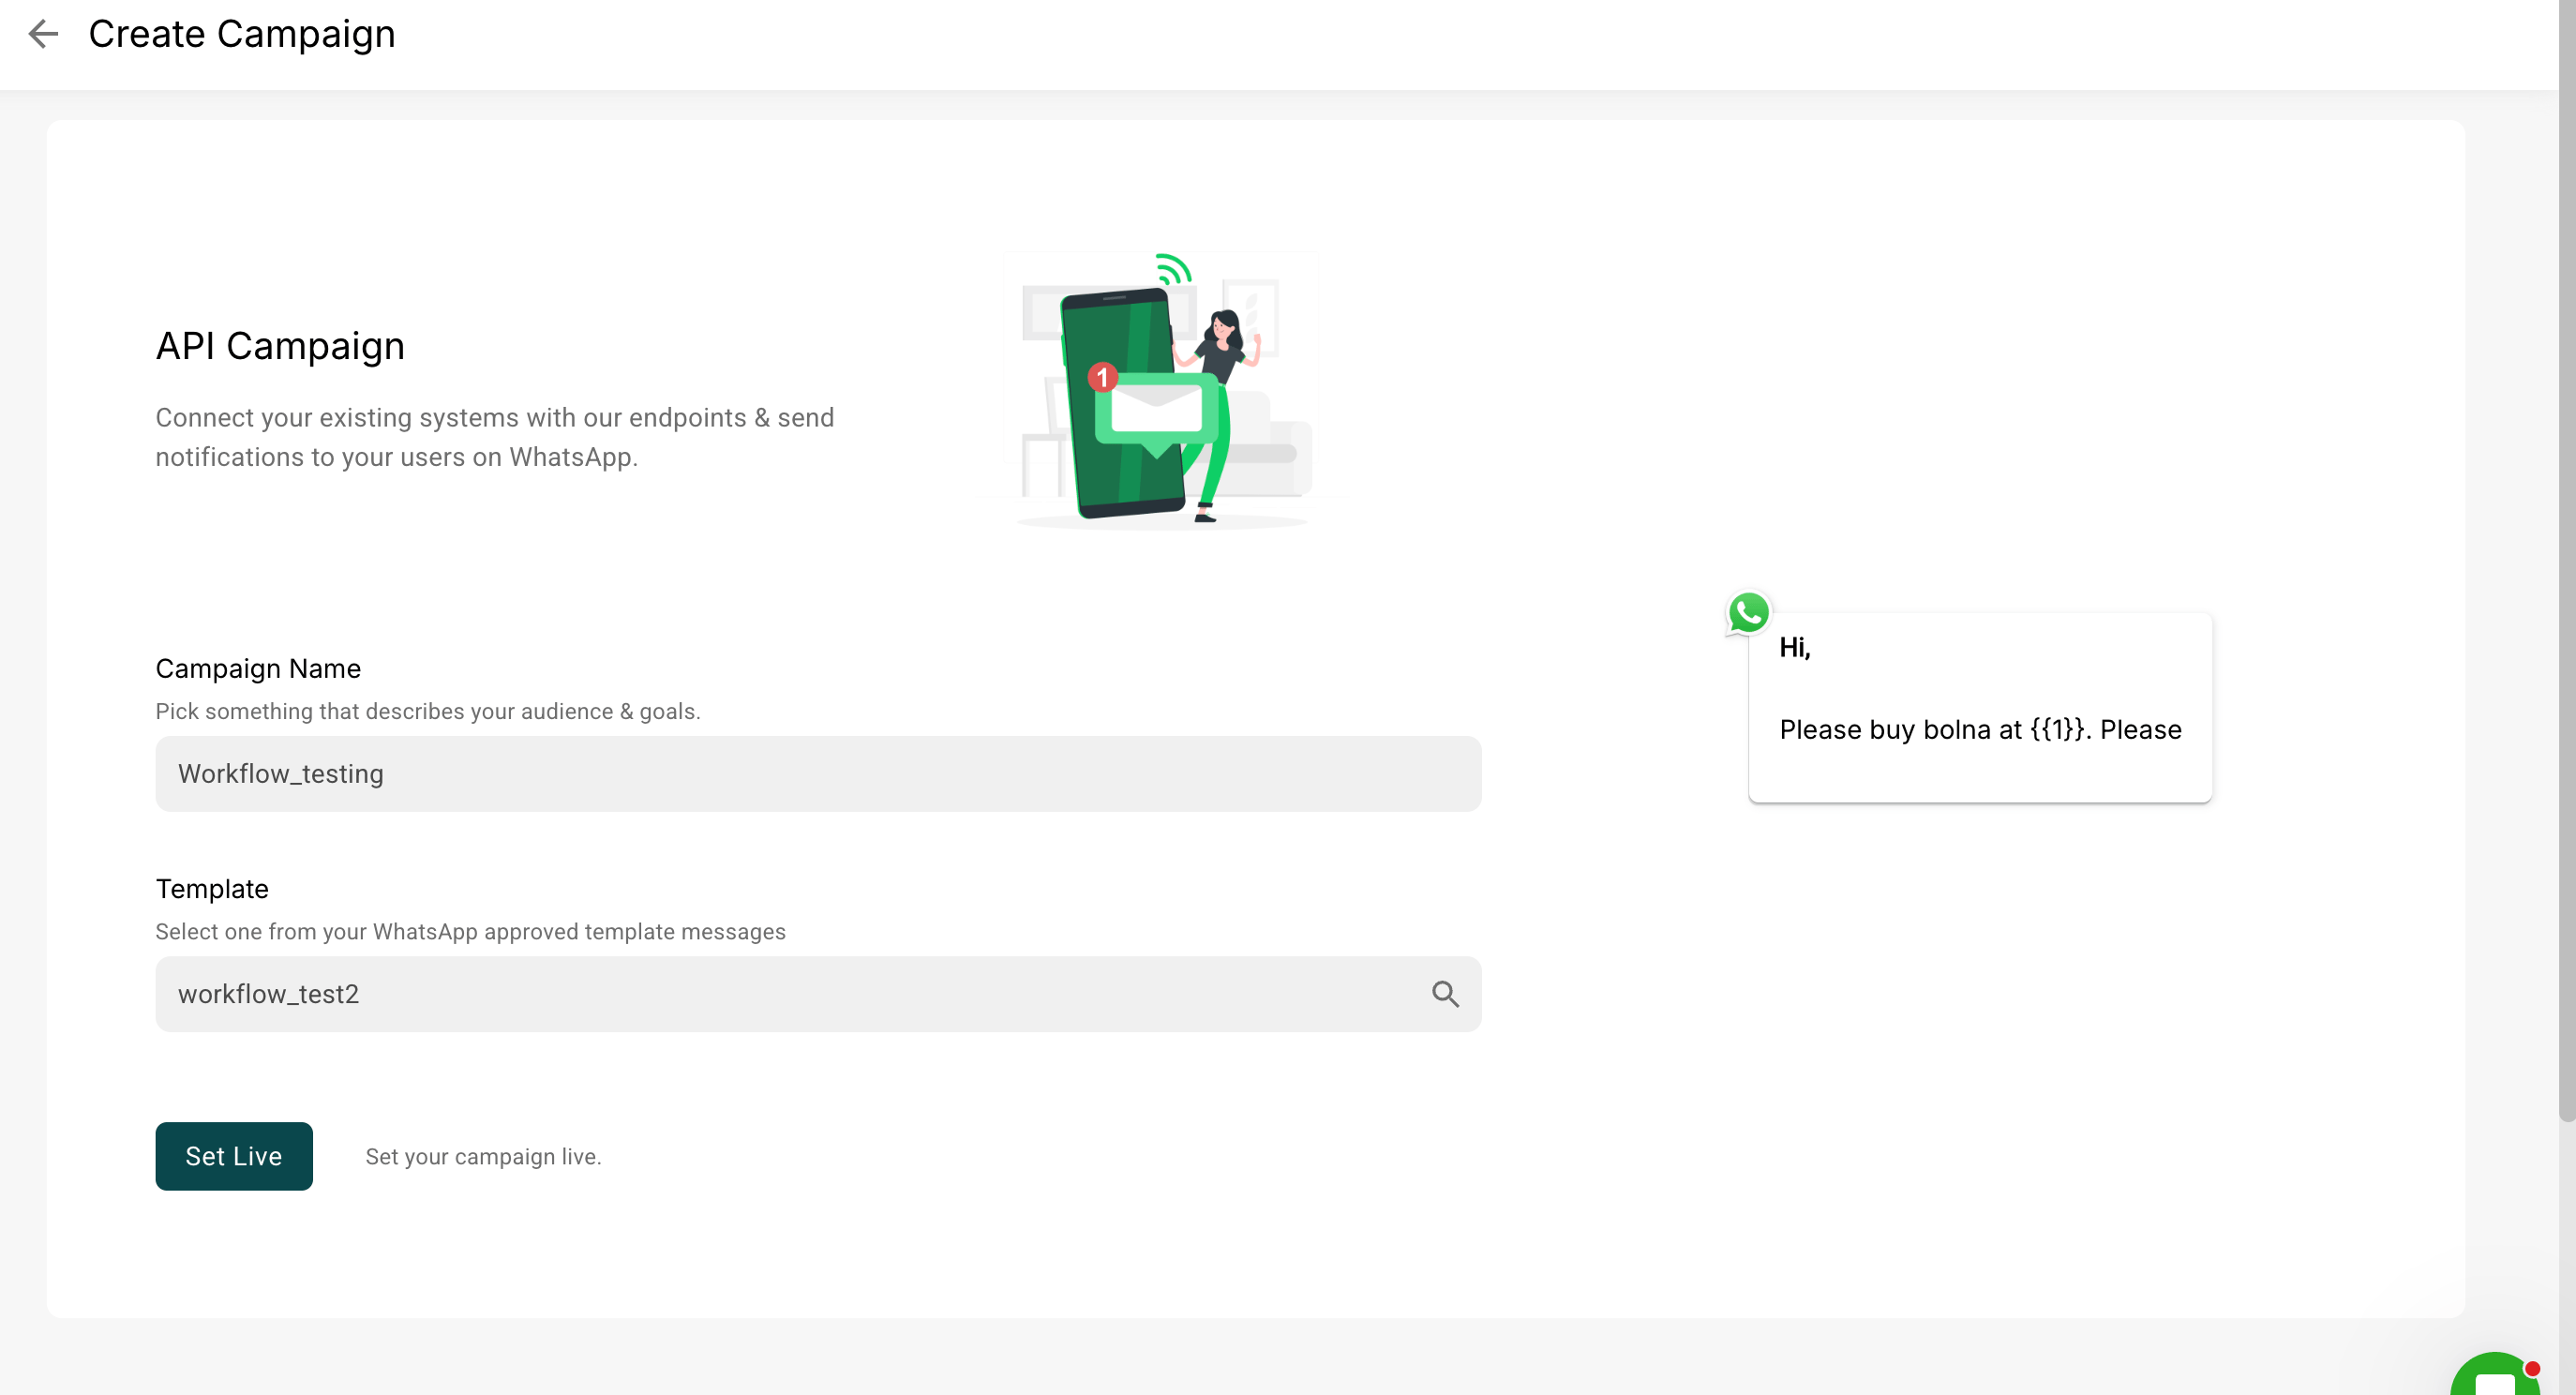 Use the **Test** option on the live campaign to confirm delivery before wiring it into a workflow.
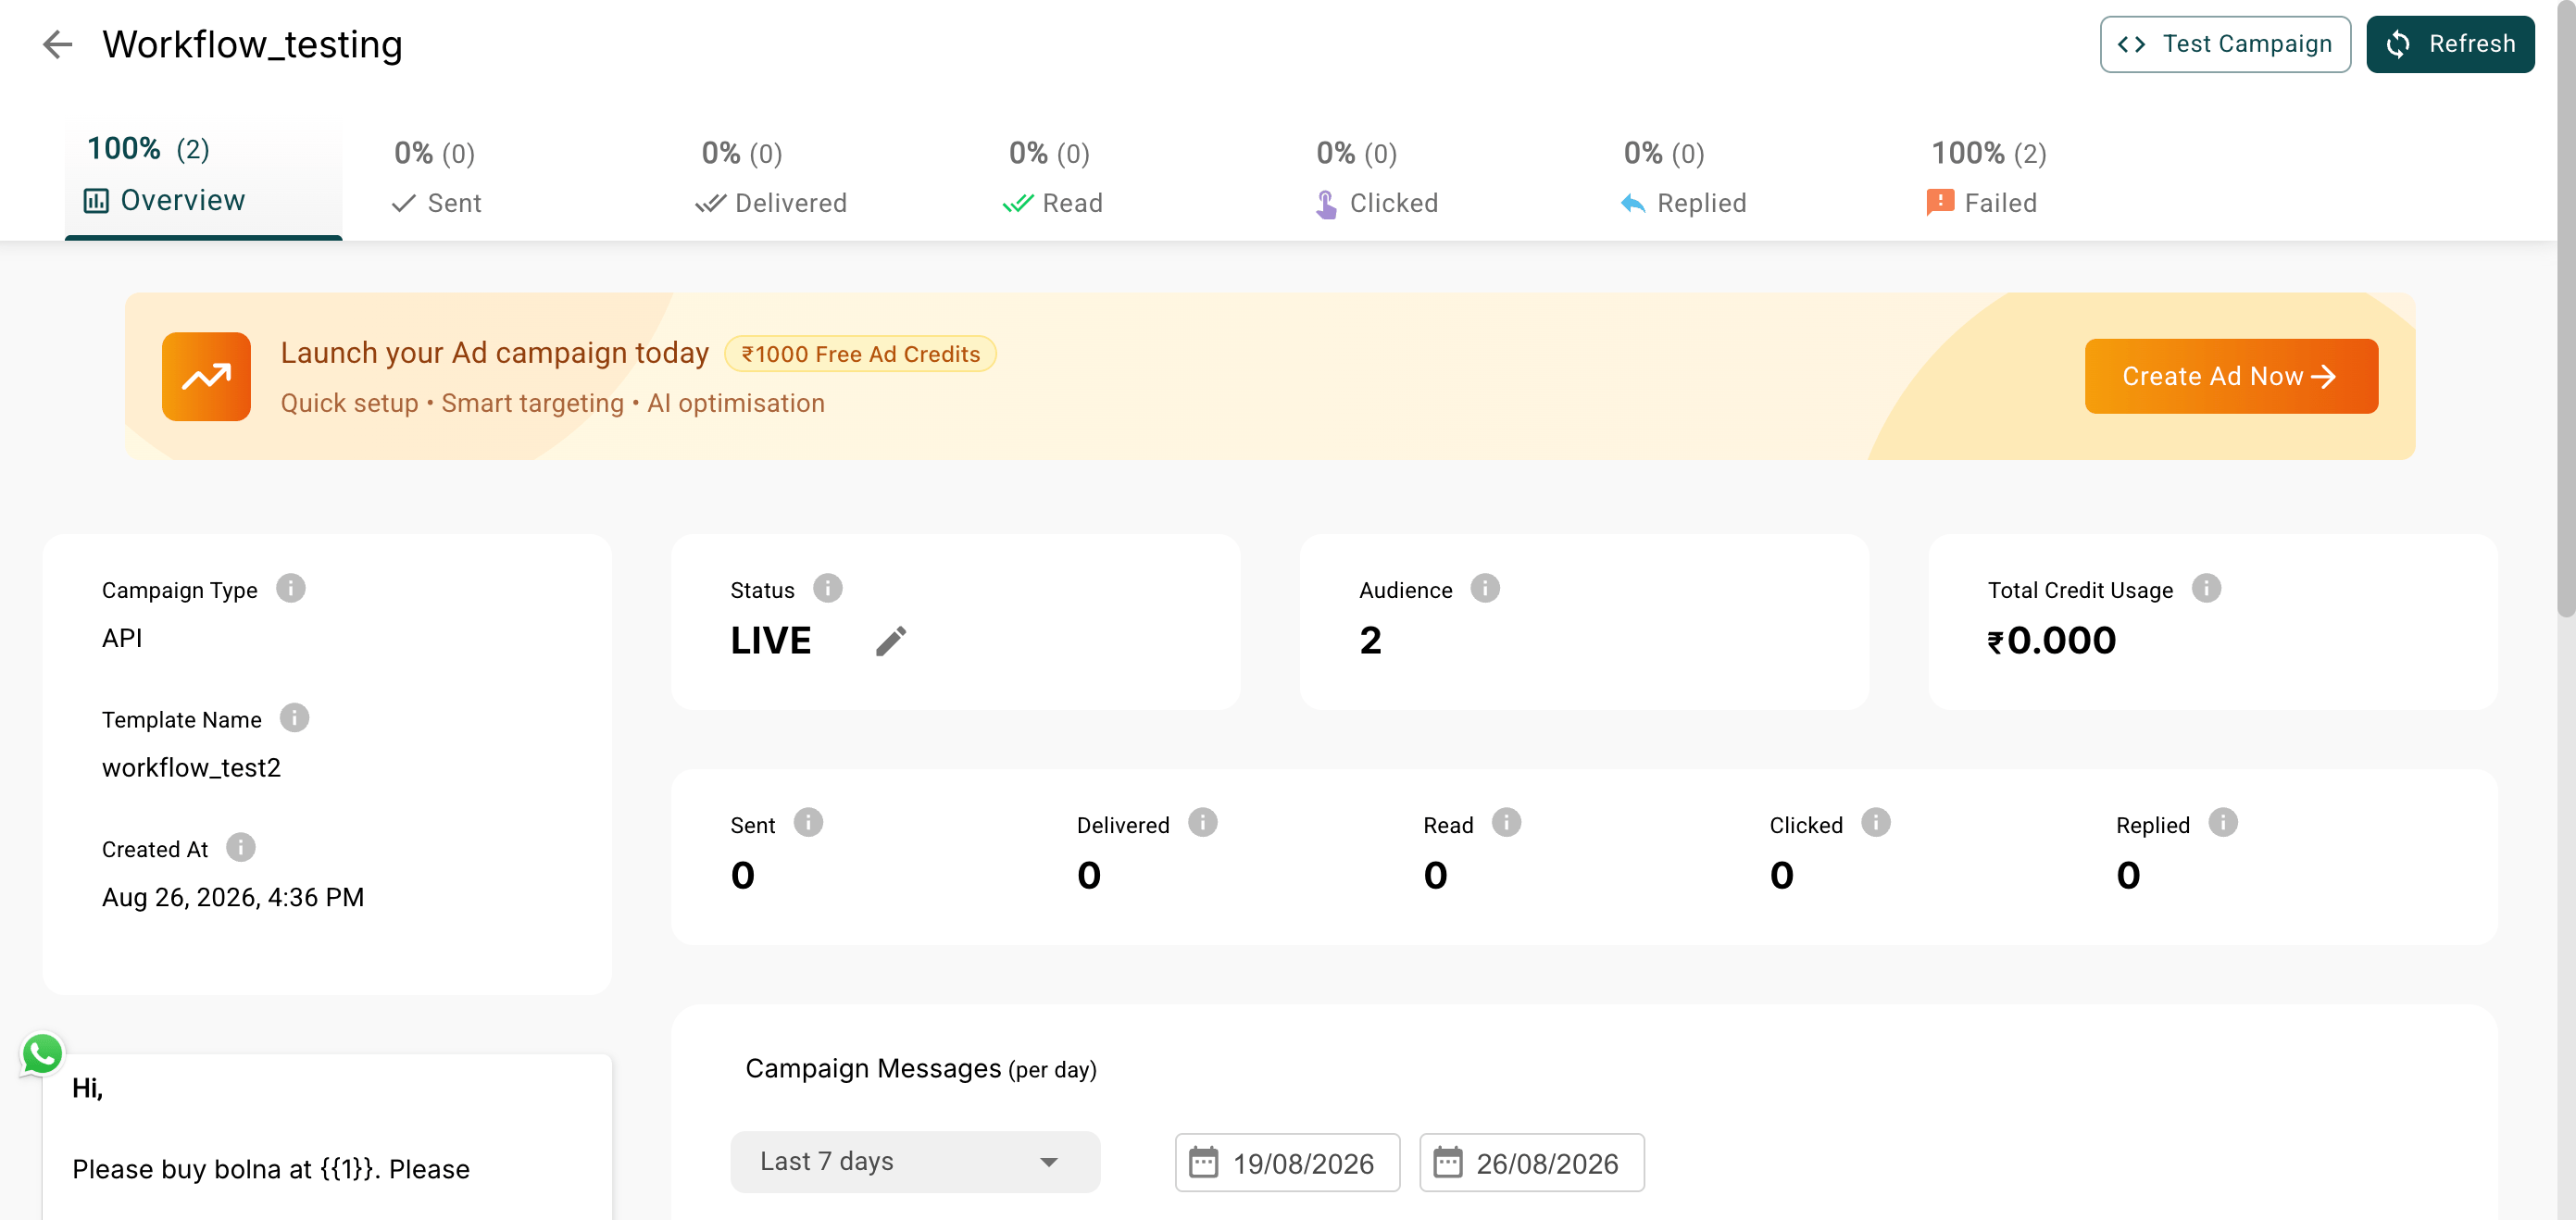
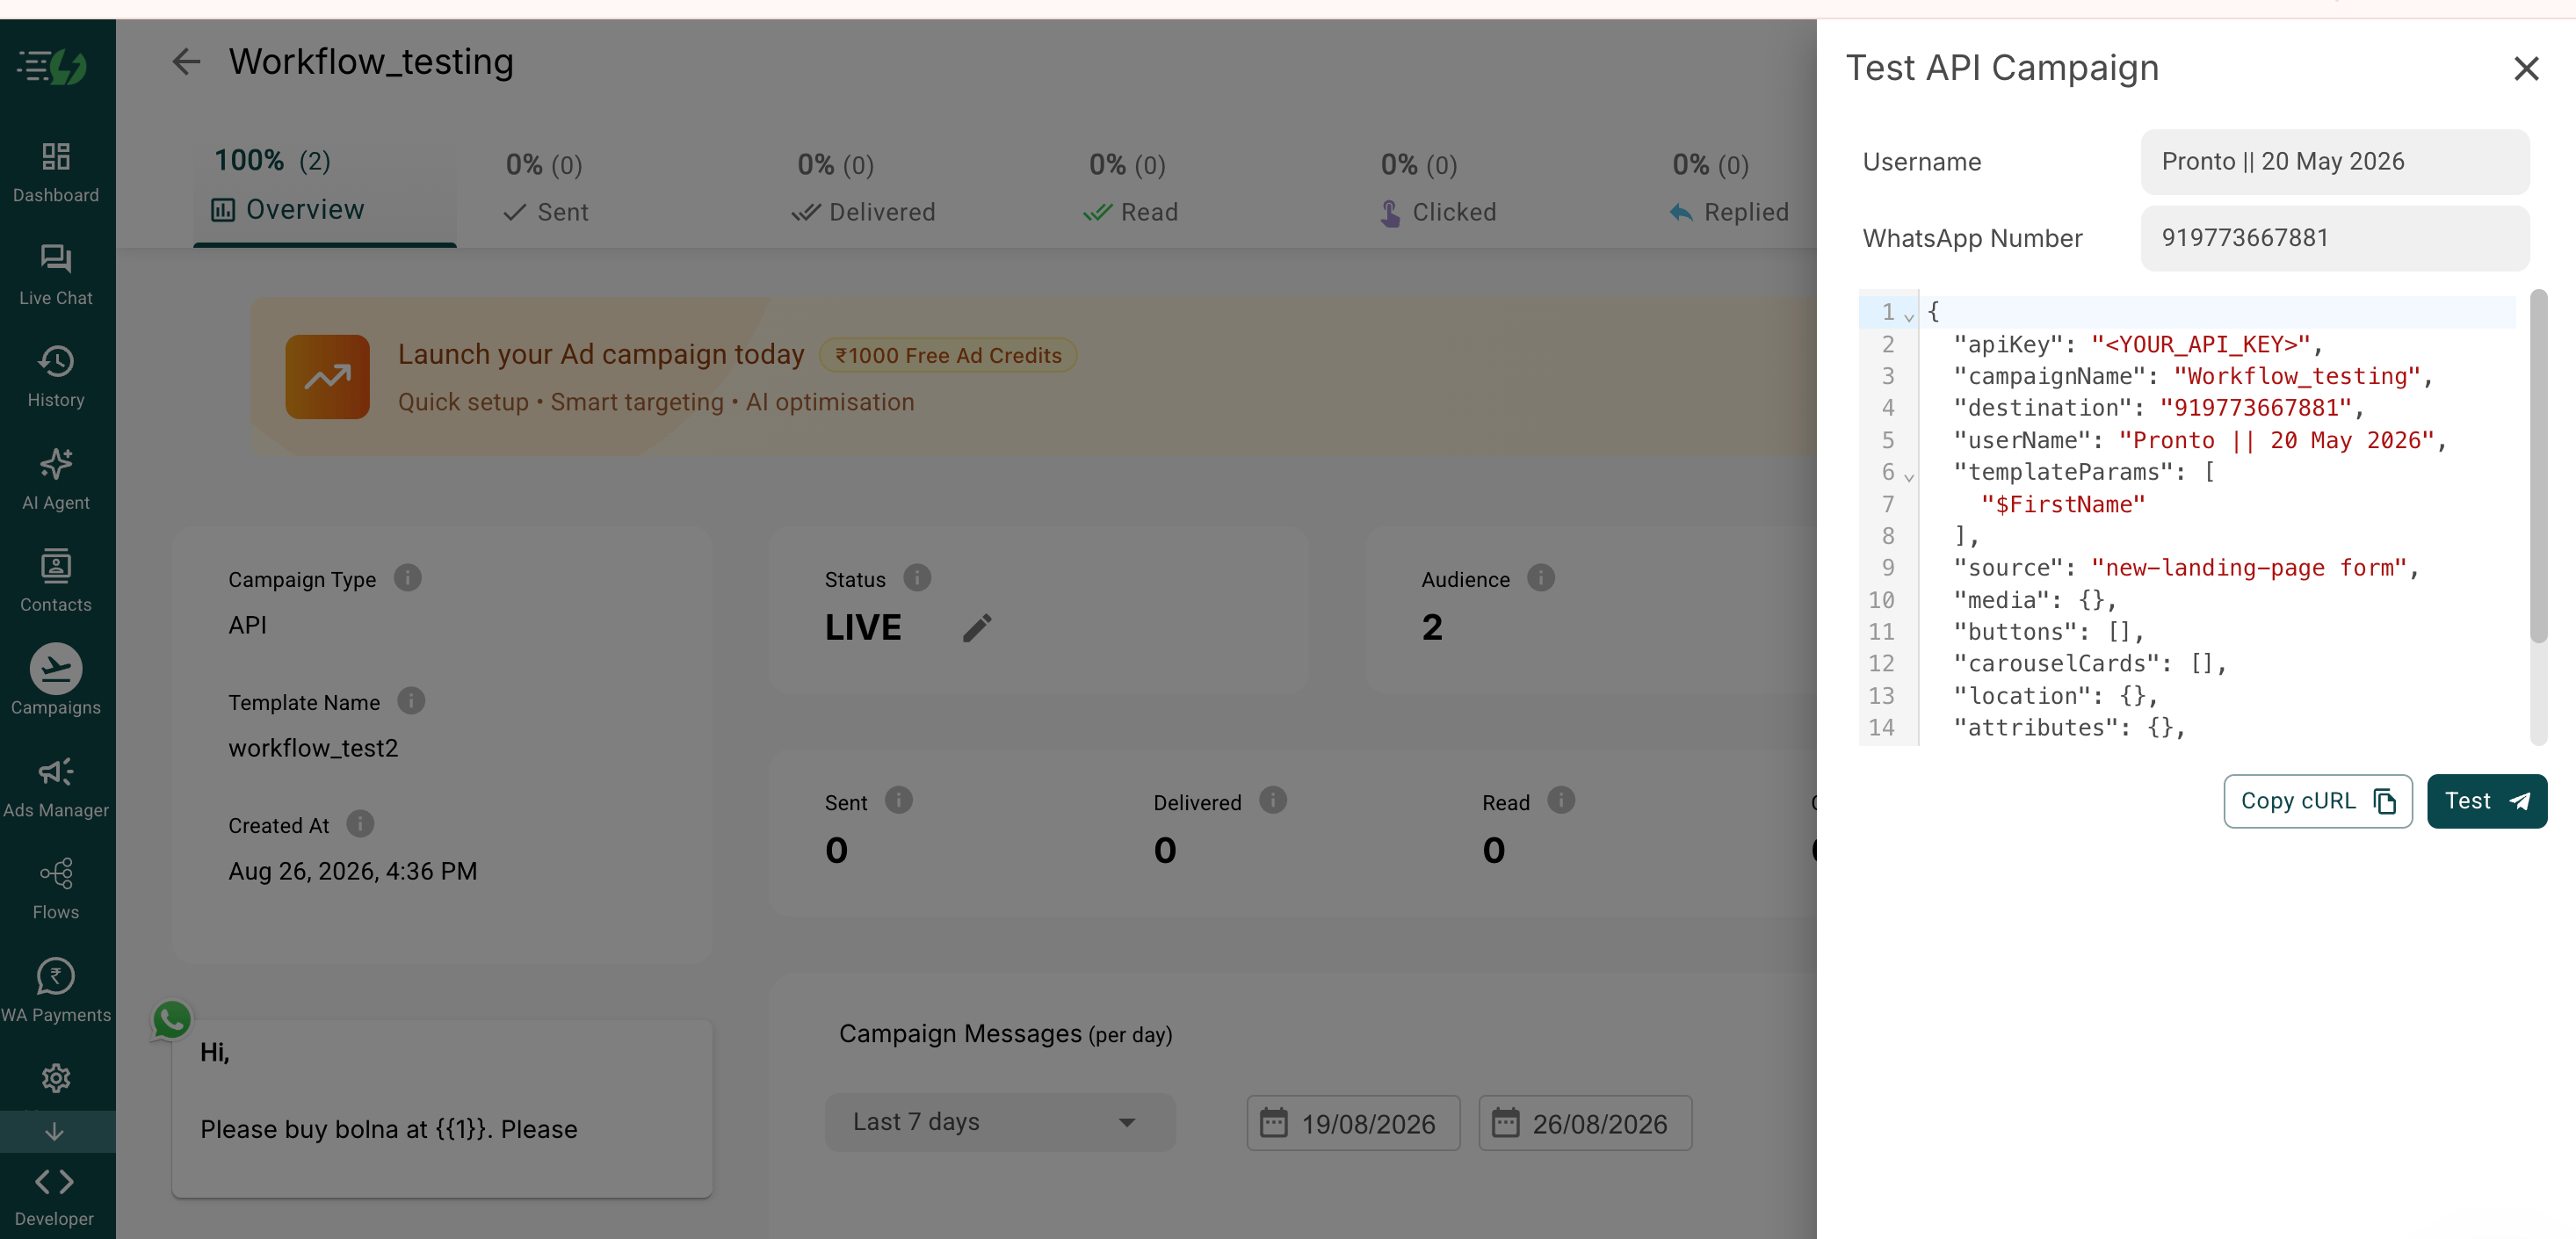 Head back to Bolna and refresh the campaign list — the new campaign is now selectable from the AiSensy WhatsApp node.
## For developers: the `aisensy_whatsapp` node
If you're building workflows through the Bolna API rather than the dashboard, the node type is `aisensy_whatsapp`. Its config fields (`template_name`, `language`, `recipient`, `variables`, `campaign_name`) and a full JSON example are documented in [Workflow Nodes](/docs/workflows/nodes#aisensy_whatsapp) — including a note that the node is fire-and-forget for now, so there's no delivery status to branch on yet.
***
## Debugging tips
| Symptom | What to check |
| ------------------------------------------------ | --------------------------------------------------------------------------------------------------------------------------------------------------- |
| Meta rejected my template | Review the rejection reason and resubmit — AiSensy's help center documents the approval process in detail |
| Not sure what's allowed in a template | Check AiSensy's template content guidelines before writing, not after |
| Message fails to send with an API error | Look up the error code in AiSensy's API error reference |
| Campaign list is empty in Bolna | Confirm the API key belongs to the right project, and that the project has at least one *launched* campaign — approved templates alone won't appear |
| Test message sends, live workflow doesn't | Check the recipient variable is populated for that contact, and that the number is in international format |
| Message sends but variables are blank or shifted | Template placeholders are positional and must be contiguous from `1`. A missing `"2"` shifts everything after it |
Head back to Bolna and refresh the campaign list — the new campaign is now selectable from the AiSensy WhatsApp node.
## For developers: the `aisensy_whatsapp` node
If you're building workflows through the Bolna API rather than the dashboard, the node type is `aisensy_whatsapp`. Its config fields (`template_name`, `language`, `recipient`, `variables`, `campaign_name`) and a full JSON example are documented in [Workflow Nodes](/docs/workflows/nodes#aisensy_whatsapp) — including a note that the node is fire-and-forget for now, so there's no delivery status to branch on yet.
***
## Debugging tips
| Symptom | What to check |
| ------------------------------------------------ | --------------------------------------------------------------------------------------------------------------------------------------------------- |
| Meta rejected my template | Review the rejection reason and resubmit — AiSensy's help center documents the approval process in detail |
| Not sure what's allowed in a template | Check AiSensy's template content guidelines before writing, not after |
| Message fails to send with an API error | Look up the error code in AiSensy's API error reference |
| Campaign list is empty in Bolna | Confirm the API key belongs to the right project, and that the project has at least one *launched* campaign — approved templates alone won't appear |
| Test message sends, live workflow doesn't | Check the recipient variable is populated for that contact, and that the number is in international format |
| Message sends but variables are blank or shifted | Template placeholders are positional and must be contiguous from `1`. A missing `"2"` shifts everything after it |